S3 Object Querying with JMESPath

A quick post with some useful querying patterns when using JMESPath queries to find keys in a target S3 bucket.

Finding and filtering with JMESPath expressions

Find keys ending or starting with a certain value, and sort by Size

Here is a JMESPath query using s3api to find and sort keys based on the ending with a certain value, with the sort then being applied based on the resulting key sizes.

aws s3api list-objects-v2 --bucket example-bucket --query "Contents[?ends_with(Key, 'example')] | sort_by(@, &Size)"

To do the same as above, but for keys starting with a specific value, change the ends_with boolean expression to starts_with.

List all objects in the bucket, selecting only specific target keys, you can use a command like:

aws s3api list-objects-v2 --bucket example-bucket --query "Contents[*].[Key,Size]"

To refine that down to the first 3 x items only, add [-3:] to the end. For example:

aws s3api list-objects-v2 --bucket example-bucket --query "Contents[*].[Key,Size][-3:]"

Pipe operator

The pipe operator is used to stop projections in the query, or group expressions together.

Here is an example of filtering objects in a bucket down, followed by another expression to find only those with a key containing the value example_string:

aws s3api list-objects-v2 --bucket example-bucket --query "Contents[*] | [? contains(Key, 'example_string')]"

Another example, filtering down to include only objects on the STANDARD StorageClass, and then only those starting with a specific value:

aws s3api list-objects-v2 --bucket example-bucket --query "Contents[?StorageClass == 'STANDARD'] | [? starts_with(Key, 'ffc302a')]"

Transforming property names

Transforming keys / properties can be done using curly braces. For example, Key can be changed to become lowercase key:

aws s3api list-objects-v2 --bucket example-bucket --query "Contents[*].{key:Key}[-1:]"

This can be useful if you have a large, nested object structure and wish to create a short property in the pipeline for use in expressions further down the line. This wouldn’t be the case in the S3 object structure we’re primarily working with here, but a query example would be:

"InitialResults[*].{shortkey:Some.Nested.Object.Key} | [? starts_with(shortkey, 'example')]"

Cheap S3 Cloud Backup with BackBlaze B2

white and blue fiber optic cables in a FC storage switch

I’ve been constantly evolving my cloud backup strategies to find the ultimate cheap S3 cloud backup solution.

The reason for sticking to “S3” is because there are tons of cloud provided storage service implementations of the S3 API. Sticking to this means that one can generally use the same backup/restore scripts for just about any service.

The S3 client tooling available can of course be leveraged everywhere too (s3cmd, aws s3, etc…).

BackBlaze B2 gives you 10GB of storage free for a start. If you don’t have too much to backup you could get creative with lifecycle policies and stick within the 10GB free limit.

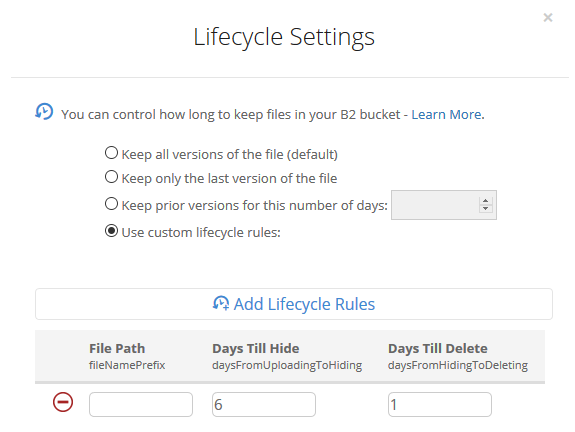
a lifecycle policy to delete objects older than 7 days.

Current Backup Solution

This is the current solution I’ve setup.

I have a bunch of files on a FreeNAS storage server that I need to backup daily and send to the cloud.

I’ve setup a private BackBlaze B2 bucket and applied a lifecycle policy that removes any files older than 7 days. (See example screenshot above).

I leveraged a FreeBSD jail to install my S3 client (s3cmd) tooling, and mount my storage to that jail. You can follow the steps below if you would like to setup something similar:

Step-by-step setup guide

Create a new jail.

Enable VNET, DHCP, and Auto-start. Mount the FreeNAS storage path you’re interested in backing up as read-only to the jail.

The first step in a clean/base jail is to get s3cmd compiled and installed, as well as gpg for encryption support. You can use portsnap to get everything downloaded and ready for compilation.

portsnap fetch
portsnap extract # skip this if you've already run extract before
portsnap update

cd /usr/ports/net/py-s3cmd/
make -DBATCH install clean
# Note -DBATCH will take all the defaults for the compile process and prevent tons of pop-up dialogs asking to choose. If you don't want defaults then leave this bit off.

# make install gpg for encryption support
cd /usr/ports/security/gnupg/ && make -DBATCH install clean

The compile and install process takes a number of minutes. Once complete, you should be able to run s3cmd –configure to set up your defaults.

For BackBlaze you’ll need to configure s3cmd to use a specific endpoint for your region. Here is a page that describes the settings you’ll need in addition to your access / secret key.

After gpg was compiled and installed you should find it under the path /usr/local/bin/gpg, so you can use this for your s3cmd configuration too.

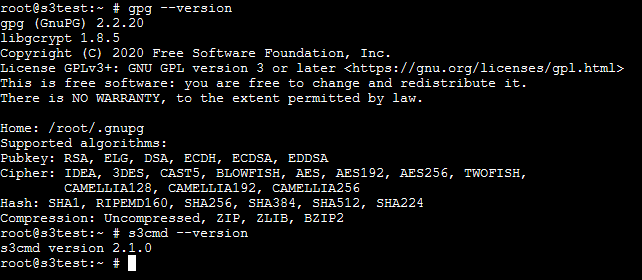
Double check s3cmd and gpg are installed with simple version checks.

gpg --version
s3cmd --version
quick version checks of gpg and s3cmd

A simple backup shell script

Here is a quick and easy shell script to demonstrate compressing a directory path and all of it’s contents, then uploading it to a bucket with s3cmd.

DATESTAMP=$(date "+%Y-%m-%d")
TIMESTAMP=$(date "+%Y-%m-%d-%H-%M-%S")

tar --exclude='./some-optional-stuff-to-exclude' -zcvf "/root/$TIMESTAMP-backup.tgz" .
s3cmd put "$TIMESTAMP-backup.tgz" "s3://your-bucket-name-goes-here/$DATESTAMP/$TIMESTAMP-backup.tgz"

Scheduling the backup script is an easy task with crontab. Run crontab -e and then set up your desired schedule. For example, daily at 25 minutes past 1 in the morning:

25 1 * * * /root/backup-script.sh

My home S3 backup evolution

I’ve gone from using Amazon S3, to Digital Ocean Spaces, to where I am now with BackBlaze B2. BackBlaze is definitely the cheapest option I’ve found so far.

Amazon S3 is overkill for simple home cloud backup solutions (in my opinion). You can change to use infrequent access or even glacier tiered storage to get the pricing down, but you’re still not going to beat BackBlaze on pure storage pricing.

Digital Ocean Spaces was nice for a short while, but they have an annoying minimum charge of $5 per month just to use Spaces. This rules it out for me as I was hunting for the absolute cheapest option.

BackBlaze currently has very cheap storage costs for B2. Just $0.005 per GB and only $0.01 per GB of download (only really needed if you want to restore some backup files of course).

Concluding

You can of course get more technical and coerce a willing friend/family member to host a private S3 compatible storage service for you like Minio, but I doubt many would want to go to that level of effort.

So, if you’re looking for a cheap S3 cloud backup solution with minimal maintenance overhead, definitely consider the above.

This is post #4 in my effort towards 100DaysToOffload.

Fast Batch S3 Bucket object deletion from the shell

This is a quick post showing a nice and fast batch S3 bucket object deletion technique.

I recently had an S3 bucket that needed cleaning up. It had a few million objects in it. With path separating forward slashes this means there were around 5 million or so keys to iterate.

The goal was to delete every object that did not have a .zip file extension. Effectively I wanted to leave only the .zip file objects behind (of which there were only a few thousand), but get rid of all the other millions of objects.

My first attempt was straight forward and naive. Iterate every single key, check that it is not a .zip file, and delete it if not. However, every one of these iterations ended up being an HTTP request and this turned out to be a very slow process. Definitely not fast batch S3 bucket object deletion…

I fired up about 20 shells all iterating over objects and deleting like this but it still would have taken days.

I then stumbled upon a really cool technique on serverfault that you can use in two stages.

  1. Iterate the bucket objects and stash all the keys in a file.
  2. Iterate the lines in the file in batches of 1000 and call delete-objects on these – effectively deleting the objects in batches of 1000 (the maximum for 1 x delete request).

In-between stage 1 and stage 2 I just had to clean up the large text file of object keys to remove any of the lines that were .zip objects. For this process I used sublime text and a simple regex search and replace (replacing with an empty string to remove those lines).

So here is the process I used to delete everything in the bucket except the .zip objects. This took around 1-2 hours for the object key path collection and then the delete run.

Get all the object key paths

Note you will need to have Pipe Viewer installed first (pv). Pipe Viewer is a great little utility that you can place into any normal pipeline between two processes. It gives you a great little progress indicator to monitor progress in the shell.

aws s3api list-objects --output text --bucket the-bucket-name-here --query 'Contents[].[Key]' | pv -l > all-the-stuff.keys


Remove any object key paths you don’t want to delete

Open your all-the-stuff.keys file in Sublime or any other text editor with regex find and replace functionality.

The regex search for sublime text:

^.*.zip*\n

Find and replace all .zip object paths with the above regex string, replacing results with an empty string. Save the file when done. Make sure you use the correctly edited file for the following deletion phase!

Iterate all the object keys in batches and call delete

tail -n+0 all-the-stuff.keys | pv -l | grep -v -e "'" | tr '\n' '\0' | xargs -0 -P1 -n1000 bash -c 'aws s3api delete-objects --bucket the-bucket-name-here --delete "Objects=[$(printf "{Key=%q}," "$@")],Quiet=false"' _

This one-liner effectively:

  • tails the large text file (mine was around 250MB) of object keys
  • passes this into pipe viewer for progress indication
  • translates (tr) all newline characters into a null character ‘\0’ (effectively every line ending)
  • chops these up into groups of 1000 and passes the 1000 x key paths as an argument with xargs to the aws s3api delete-object command. This delete command can be passed an Objects array parameter, which is where the 1000 object key paths are fed into.
  • finally quiet mode is disabled to show the result of the delete requests in the shell, but you can also set this to true to remove that output.

Effectively you end up calling aws s3api delete-object passing in 1000 objects to delete at a time.

This is how it can get through the work so quickly.

Nice!

Running an S3 API compatible object storage server (Minio) on the Raspberry Pi

I’ve recently become interested in hosting my own local S3 API compatible object storage server at home.

So tonight I set about setting up Minio.

Image result for minio

Minio is an object storage server that is S3 API compatible. This means I’ll be able to use my working knowledge of the Amazon S3 API and tools, but to interact with my own, locally hosted storage service running on a Raspberry Pi.

I had heard about Zenko before (an S3 API compatible object storage server) but was searching around for something really lightweight that I could easily run on ARM architecture – i.e. my Raspberry Pi model 3 I have sitting on my desk right now. In doing so, Minio was the first that I found that could easily be compiled to run on the Raspberry Pi.

The goal right now is to have a local object storage service that is compatible with S3 APIs that I can use for home use. This has a bunch of cool use cases, and the ones I am specifically interested in right now are:

  • Being able to write scripts that interact with S3, but test them locally with Minio before even having to think about deploying them to the cloud. A local object storage API is going to be free and fast. Plus it’s great knowing that you’re fully in control of your own data.
  • Setting up a publically exposable object storage service that I can target with serverless functions that I plan to be running on demand in the cloud to do processing and then output artifacts to my home object storage service.

The second use case above is what I intend on doing to send ffmpeg processed video to. Basically I want to be able to process video from online services using something like AWS Lambda (probably using ffmpeg bundled in with the function) and output the resulting files to my home storage system.

The object storage service will receive these output files from Lambda and I’ll have a cronjob or rsync setup to then sync the objects placed into my storage bucket(s) to my home Plex media share.

This means I’ll be able to remotely queue up stuff to watch via a simple interface I’ll expose (or a message queue of some sort) to be processed by Lambda, and by the time I’m home everything will be ready to watch in Plex.

Normally I would be more interesting in running the Docker image for Minio, but at home I want something that is really cheap to run, and so compiling Minio for Raspberry Pi makes total sense to me here, as this device is super cheap to level powered on 24/7 as opposed to running something beefier that would instead run as a Docker host or lightweight Kubernetes home cluster.

Here’s the quick start up guide to get it running on Raspberry Pi

You’ll basically download Go, extract it, set it up on your path, then use it to compile Minio’s source code into an ARM compatible binary that you can run on your pi.

wget https://dl.google.com/go/go1.10.3.linux-armv6l.tar.gz
sudo tar -C /usr/local -xzf go1.10.3.linux-armv6l.tar.gz
export PATH=$PATH:/usr/local/go/bin # put into ~/.profile
source .profile
go get -u github.com/minio/minio
mkdir ~/minio-data
cd go/bin
./minio server ~/minio-data/

And you’re up and running! It’s that simple to get going quickly.

Running interactively you’ll get a default access and secret key in the terminal, so head on over to the Web UI / interface to check things out: http://your-raspberry-pi-ip-or-hostname:9000/minio/

Enter your credentials to login.

Of course at this stage you can also start using your S3 API compatible command line tools to start working with your new object storage server too.

Nice!

Simple Content Delivery Network (CDN) using Amazon AWS (S3 + CloudFront)


Content Delivery Networks

Having a content delivery network has many benefits for your users or clients. One of the most obvious reasons of having a CDN, is the ability to serve up content to your users from multiple (often the most optimal) locations.  Users access files that originate from one original source location, but the content is delivered by the closest location(s), often with the lowest latency and highest possible speed.

Using Amazon CloudFront, you can share dynamic, static, or even streamed content to users (including full websites), using Amazon’s global network of edge locations. This means that content can be served to users at the highest possible speeds, with the lowest possible latencies. In this blog post, I will cover the steps you need to take to deploy a basic CDN using Amazon AWS. For this purpose, we will leverage a combination of Amazon S3 + CloudFront.


Setting up Amazon S3

Amazon S3 (Amazon Simple Storage Service) is essentially Amazon’s “storage for the Internet”, and as explained above, CloudFront is a content delivery network service. As such, both products sit in Amazon’s “Storage & Content Delivery” stack.


  • To get started you will of course need an Amazon AWS account. Go to http://aws.amazon.com/ and register. You will need to provide credit card details, but most products have some sort of free tier that you can utilise for initial testing (usually free for up to 1 year, based on certain utilisation thresholds).
  • Once you are all signed up, you’ll need to navigate to the AWS Web Console. This is the central location you can use to manage all AWS services (among other options such as the AWS SDK and Command Line).

aws-console-example
The central, AWS Web Management Console

  • To start, we’ll need to define an origin location for our content. This is the location our original files are kept. For this purpose, we will use Amazon S3. It allows us easy access to files that we place in something Amazon call a “bucket”. I like to think of it as a folder, or container. You can have as many buckets as you wish, however each one’s name needs to be completely unique across Amazon S3. Click on “S3” under the “Storage & Content Delivery” heading of your AWS Console to get started.
  • From here, you will be greeted with a welcome page and some explanation of what S3 is. Simply click “Create Bucket” to get going.

create-bucket


  • Provide a unique bucket name, and specify a region to use. Regions have the benefit of allowing organisations to comply with storage regulation rules – for example, if you were storing client data that you were bound legally to keep within the UK, you would specify the Ireland region.

new-bucket


  • Your new bucket will appear in the S3 Management Console after being created. Simply click the name of the bucket to open it. For our simple CDN, we’ll just be serving up one single file – pretend this was a really large file that needed efficient distribution to many people – for example a large media file. At the top left, you’ll see an “Upload” button. Click this, and choose a file to upload as your test file. I will be using a simple image file. (By the way, Amazon have a service called “Amazon Import/Export”, which allows you to send really large amounts of data via post on portable media to Amazon for them to upload directly to your Amazon S3 or Glacier services).
  • Click “Start Upload” once you have chosen a file to test with.
  • After the file is finished uploading, it will appear in the console under your bucket name. (I called mine “image-for-distribution.png”).

example-file-in-bucket


  • Right-click the file, and choose the option “Make Public” for this test. This choice would be affected by the nature of the files you would want to deliver to users in your own configuration, but for this simple example, this is what I am choosing.
  • Right-click the file again, and choose “Properties“. Here you can get the direct, public link to your file and test access to it in your web browser. This is simple, direct access, and is not the access we are aiming for, as we will utilise our CDN with CloudFront to serve the file in our final configuration. This is just to test that the direct link is working.

aws-file-properties


Setting up CloudFront and your Distribution

  • Now that we know our basic file is being correctly served from Amazon S3, we’ll navigate to “CloudFront” from the main AWS Console (aws.amazon.com). A quick way to get there is by clicking the orange cube icon in the top left of your AWS page – wherever you are in the console, it’ll take you back to the main AWS console. From there just click “CloudFront“.
  • In CloudFront, we’ll want to create something called a “Distribution“. Click the “Create Distribution” button to get started.

create-distribution


  • Make sure you select “Download” type for the “delivery method” when asked on the next page, then click “Continue“.

cloudfront-delivery-method


  • We’ll now select various options for our CloudFront Distribution.
    • For “Origin Domain Name“, click the text box and you’ll see a populated list of Amazon S3 buckets. Your bucket you created earlier should feature here. Click it to select it.
    • The “Origin ID” should auto populate based on your S3 bucket name you chose.
    • If you wish to restrict users to only access your content via CloudFront URLs, and not direct by S3 URLs, then choose “Yes” for “Restrict Bucket Access“.
    • If you chose “Yes” for restricting bucket access, you’ll also need to create a “Comment” and “Grant Read Permissions” on the bucket for CloudFront’s access to the S3 bucket. Click “Yes, Update Bucket Policy” to have CloudFront get read access automatically to the S3 bucket.
    • Select “HTTP and HTTPS” for “Viewer Protocol Policy“.
    • You can customise the object caching properties if you wish, but for this example, just leave the “Default Cache Behavior Settings” on their defaults.
    • Now you can set your “Distribution Settings“. Choose “Use All Edge Locations (Best Performance)” for “Price Class“. This will ensure that all edge locations around the world are used to distribute your content in the fastest, most efficient way to your users. You could also restrict this to other groups of regions e.g. only the US and Europe for example – this would be a cheaper option, but not as efficient for all users globally.
    • Next, we can add an alternate CNAME for the distribution. This is highly recommended so that you can provide your own domain name formatted URLs to users, instead of a long, ugly default Amazon CloudFront URL. Enter something now, (for example I will use cdn.shogan.co.uk as I own the domain and can create this CNAME record myself in DNS). Once you are complete with this distribution setup, you should get the Distribution URL, and point a new CNAME record to the full URL that CloudFront assigns to your distribution.
    • Leave all other options at their defaults for now, and make sure that the last option “Distribution State” is “Enabled“, then click the “Create Distribution” button at the very bottom.

example-distribution-settings1 example-distribution-settings2

  • Your Distribution should now be created. Use the Navigation menu on the left side of the screen and click “Distribution” to see a list of your CloudFront Distributions.

cloudfront-distributions


  • At first the “Status” will show “InProgress“. After a few minutes this should change to “Deployed“.
  • In the mean time, look for your “Domain Name” that this Distribution has been assigned, and go and create a CNAME record pointing the CNAME you specified when creating this distribution, to the domain name. For example, you may have something like dxxxxxxxxxm.cloudfront.net. In my case, I specified a CNAME of cdn.shogan.co.uk, so I will create a CNAME record linking these together.


Testing

Once your CNAME record is created, type in your new CNAME record, followed by a forward slash, and then the name of the file you originally uploaded to your S3 bucket that is linked to by this CloudFront distribution. For example, my file was called “file-for-distribution.png” and my CNAME record I made is cdn.shogan.co.uk. So to utilise my CloudFront CDN, I would simply access the file as “cdn.shogan.co.uk/image-for-distribution.png”. If your DNS takes a while to apply/propagate, then you can simply use the CloudFront domain name assigned to your Distribution (for example dxxxxxxxxxxm.cloudfront.net/yourfilename.extension) to test out your distribution. Remember to ensure your distribution is in a deployed state before testing. You should now see your file served up in your web browser via your brand spanking new Amazon AWS powered CDN!


Conclusion

That concludes the basic setup of a Amazon S3 + CloudFront powered Content Delivery Network. I hope this was useful for some. In forthcoming blog posts I will delve into setting up custom logging and monitoring / alerting for your CDN. Please remember to like/share/tweet this post out to friends if you thought it was useful.