Stand Reminder App – Remember to Stand

standing desk

I wanted a really simple stand reminder app in my system tray to remind me to stand up once in a while while working at my standing desk. (I started getting lazy and sitting most of the day instead of standing!) After trying a couple of apps on macOS, I didn’t have much success. One didn’t even pop up notifications or the selected sound effect, and the other one was paid only.

I thought I would just make a quick (and dirty) solution that worked for me using Rust.

Get the source and build your own copy here

Remember to Stand is a simple app run from the command line to remind you to stand up every now and then while working.

I’m no Rust expert but have been intrigued with the language, and hence decided to write a simple utility to remind myself to stand up every now and then at my desk.

If you don’t have a standing desk, you might want to use this to remind you to stand and take a walk around every now and then to stretch your legs.

The stand reminder app has a customisable time delay between the two different notification modes. It will pop up ‘toast’ notifications with a sound effect on each notification between standing and sitting mode.

When run, it will add a small icon in the system tray area (tested on macOS and uBuntu Linux 22.04).

Build

To build you’ll need to have the Rust tool chain with cargo installed. Compile into a single executable file with:

./make.sh build

Run

Once built, you can run the executable directly – e.g. `./target/debug/remember-to-stand`, or run directly from source with:

cargo run

Install

To install, build the app in release mode with:

./make.sh build --release

Then you can place the release executable in a convenient location. (For now you’ll need to copy the system tray icon and sound file to the same location too – copy from the ./resources or the target build directory to the same path that you place the executable in)

Configure

The app will automatically create a default configuration file in your user home path: ~/.remembertostand. You can edit this file to change the notification title text messages and customise the time delays between sitting and standing modes.

For example:

{
    "config": {
        "customstandmsg": "Stand up",
        "standtimesecs": "3600",
        "sittimesecs": "3600",
        "customsitmsg": "Sit down"
    }
}

I have not tested the app much more than my own system running macOS 12.4 (Montery), but given that its written in Rust it should be fairly portable.

I have tested the toast notifications on a linux system with gnome desktop, so I know that at least that component should work on that environment.

Give it a quick try by building with Rust for own system if you need something simple like I did for stand up reminders.

Rust Cross Compile Linux to macOS using GitHub Actions

rust code

It’s easy enough to add extra targets using the cargo command when building your Rust project. However, the Rust cross compile process gets a little tricker when linking is done for platforms different to the host platform.

I wanted to setup a GitHub Actions workflow that would build binaries for different platforms from the same actions runner.

While it might be possible to use GitHub Actions Matrix to run a build across multiple operating systems and install Rust / rustup / cargo on each, performing the build in each place, I opted for a different strategy.

Using a base Rust musl build container, on top of Debian Buster, I’ve added osxcross and the required build tools. This supports building and linking macOS binaries from the Linux container.

Rust Cross Compile GitHub Action

I’ve built a Docker image for GitHub Actions to use. It is based on the popular rustup image. Currently I’ve built a musl-1.0.53 variant. My version copies in and sets up osxcross. This bakes all the heavy lifting into the image so that GitHub actions can quickly build targets for linux and macOS (x86).

You can find the action on the Rust Cross Compile GitHub Action here.

Usage example

Set up a .cargo/config file to designate the target to linker mapping. For example macOS x86:

[target.x86_64-apple-darwin]
linker = "x86_64-apple-darwin14-clang"
ar = "x86_64-apple-darwin14-ar"

Add a GitHub Actions workflow:

name: Rust static build macOS and Linux
on:
  push:
    branches:
      - main
jobs:
  build:
    name: build for all platforms
    runs-on: ubuntu-latest
    env:
      CARGO_TERM_COLOR: always
      BINARY_NAME: rust-test1
    steps:
    - uses: actions/checkout@v2
    - name: Build-musl macOS x86
      uses: Shogan/rust-musl-action@v1.0.2
      with:
        args: cargo build --target x86_64-apple-darwin --release
    - name: Build-musl Linux x86
      uses: Shogan/rust-musl-action@v1.0.2
      with:
        args: cargo build --target x86_64-unknown-linux-musl --release

Release binaries can now easily be built from a single ubuntu linux GitHub actions runner. For example, get the Cargo.toml version and create a release with the built binaries by adding a couple of extra steps:

steps:
    - uses: actions/checkout@v2
    - name: Set build version
      id: version
      shell: bash
      run: |
        VERSION="$(cat Cargo.toml | grep 'version =' -m 1 | sed 's@version =@@' | xargs)"
        echo "RELEASE_VERSION=$VERSION" >> $GITHUB_ENV
        echo "::notice::publish build version $VERSION"
    - name: Upload macOS x86 binary to release
      uses: Spikatrix/upload-release-action@b713c4b73f0a8ddda515820c124efc6538685492
      with:
        repo_token: ${{ secrets.GITHUB_TOKEN }}
        file: target/x86_64-apple-darwin/release/${{ env.BINARY_NAME }}
        asset_name: ${{ env.BINARY_NAME }}-macos-x86
        target_commit: ${{ github.sha }}
        tag: v${{ env.RELEASE_VERSION }}
        release_name: v${{ env.RELEASE_VERSION }}
        prerelease: false
        overwrite: true
        body: ${{ env.BINARY_NAME }} release

There are many ways to achieve an automated CI process that can do Rust cross compile and linking. It was an interesting investigation into custom Docker containers for GitHub actions and the Rust tool chain setting up this GitHub Action package.

Feel free to contribute or improve the GitHub Action by sending a pull request on GitHub.

Beginning Rust: Writing a Small CLI Tool

rust tool

My first go at writing an application in Rust has been slightly frustrating. Coming in from using mostly dynamic languages every day I quickly found myself butting heads with Rust’s borrow checker. However, I’ve found that this is a fair price to pay for a statically typed language with a focus on memory safety and performance.

While these Rust features do increase the barrier of entry for newcomers such as myself, they also help to keep your code in check and are certainly major contributing factors to the language’s success.

Another interesting point is that Rust doesn’t have a GC (garbage collector). As soon as something in your code is not required anymore (a function call returns) the memory associated with that scope is cleaned up. Rust inserts Drop::drop calls at compile time to do this. I imagine this is similar in concept to the way that IL or code weaving is done in the .NET world. This fact means that Rust doesn’t suffer from performance hits that languages with a GC tend to sometimes encounter. Discord wrote an interesting article on how they improved performance by switching from Go to Rust that touches on this particular point.

Goals

To take a look at the Rust language and ecosystem at a really high-level, I decided to write a simple tool. My goals were to:

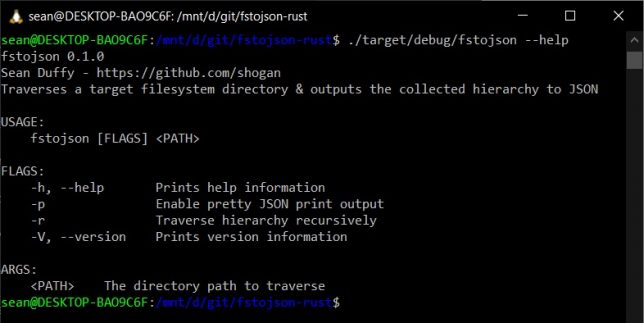
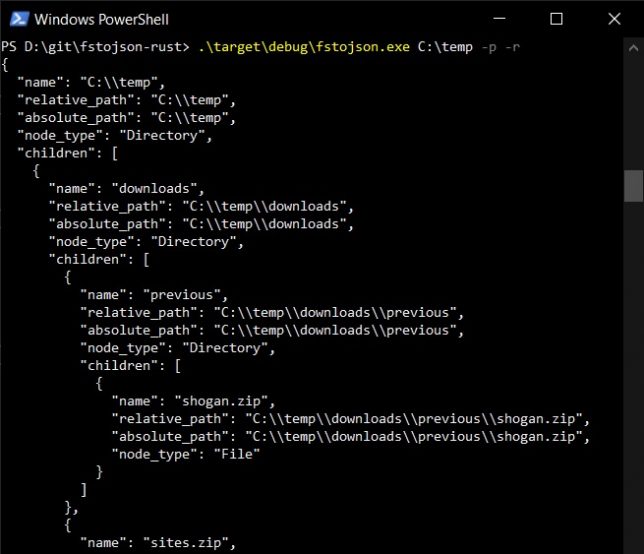
  • Write a CLI tool, small in scope. The tool will traverse a target directory in the file system recursively and print the structure to stdout as JSON.
  • Get a feeling for the language’s syntax.
  • See how package management and dependencies work.
  • Look at what the options are for cross-compiling to other platforms.

The tool – fstojson

Here is the small tool I wrote to achieve the above list of goals: fstojson-rust.

I’ve compiled my first app on macOS, Linux and Windows all from the same source, with no issues whatsoever.

Rust Packages

On my first look at Rust, packages were simple to understand and use. Rust uses “crates” and they work very similarly to JavaScript packages.

To add a crate to your project you simply add the dependency to your Cargo.toml file (akin to a package.json file in Node.js).

For example:

[dependencies]
serde_json = "1.0.68"

Once crates are installed with the cargo command, you’ll even get a lock file (Cargo.lock), just like with npm or yarn in a Node.js project.

Rust cross compiling

The first time you install Rust with rustup, the standard library for your current platform is installed. If you want to corss compile to other platforms you need to add those target platforms seperately.

Use the rustup target add command to add other platform targets. Use rustup target list to show all possible targets.

To cross-compile you’ll often also need to install a linker. For example if you were trying to compile for x86_64-unknown-linux-gnu on Windows you would need the cc linker.

Thoughts and impressions

To get a really simple “hello-world” application up and running in Rust was trivial. The cargo command makes things really easy for you to scaffold out a project.

However, I honestly struggled with anything more complex for a couple of hours after that. Mostly fighting the “borrow checker”. This is my fault because I didn’t really spend much time getting acquainted with the language initially via the documentation. I dove right in with trying to write a small app.

The last time I wrote something in a System programming language was at least 7 or 8 years ago – I wrote a tool in C++ to quiesce the file system in preparation for snapshots to be taken. Aside from that, the last time I really had to concern myself with memory management was with Objective-C (iOS), before ARC was introduced (See my first serious attempt at creating an iOS game, Cosmosis).

In my opinion, some of Rust’s great benefits also mean it has a high barrier of entry. It has a really strong emphasis on memory safety. I came at my first application trying to do all the things I can easily do in Typescript / Javascript or C#.

I very quickly realised how different things are in the Rust world, and how this opinionated approach helps to keep your code bug-free and your apps safe on memory.

Closing thoughts

After years of dynamic language use, my first introduction to Rust has been a little bit shaky. It’s a high barrier of entry, but with that said, I did find it satisfying that if there were no compiler warnings my code was pretty much guaranteed to run without issue.

The Rust ecosystem is active and thriving from what I can tell. You can use crates.io to search online for packages. You can use rustup to install toolchains and targets.

There are tons of stackoverflow questions and answers and the documentation page for Rust is full of good information.

Going forward I’ll try to dig into the Rust language a bit more. I’m on a little bit of a journey to try different programming languages (I’ve had a fair bit of experience in C# and Typescript / JavaScript, so I’m branching out from those now).

I discovered this post recently – A half-hour to learn Rust. In hindsight it would have been great to have found that before diving in.

Update: thanks to noah04 on GitHub for their improvements PR on applying some Rust idioms.