This is the third post in this series and the focus will be on completing the Raspberry Pi Kubernetes cluster by adding a worker node. You’ll also setup a software based load-balancer implementation designed for bare metal Kubernetes Clusters by leveraging MetalLB.
Here are some handy links to other parts in this blog post series:
- Building a Raspberry Pi Kubernetes Cluster – Part 1 – Routing
- Building a Raspberry Pi Kubernetes Cluster – Part 2 – Master Node
- Raspberry Pi Kubernetes Cluster with OpenFaaS for Serverless Functions (Part 4)
By now you should have 1 x Pi running as the dedicated Pi network router, DHCP, DNS and jumpbox, as well as 1 x Pi running as the cluster Master Node.
Of course it’s always best to have more than 1 x Master node, but as this is just an experimental/fun setup, one is just fine. The same applies to the Worker nodes, although in my case I added two workers with each Pi 4 having 4GB RAM.
Joining a Worker Node to the Cluster
Start off by completing the setup steps as per the Common Setup section in Part 2 with your new Pi.
Once your new Worker Pi is ready and on the network with it’s own static DHCP lease, join it to the cluster (currently only the Master Node) by using the kubeadm join command you noted down when you first initialised your cluster in Part 2.
E.g.
sudo kubeadm join 10.0.0.50:6443 --token kjx8lp.wfr7n4ie33r7dqx2 \
     --discovery-token-ca-cert-hash sha256:25a997a1b37fb34ed70ff4889ced6b91aefbee6fb18e1a32f8b4c8240db01ec3
After a few moments, SSH back to your master node and run kubectl get nodes. You should see the new worker node added and after it pulls down and starts the weave net CNI image it’s status will change to Ready.

Setting up MetalLB
The problem with a ‘bare metal’ Kubernetes cluster (or any self-installed, manually configured k8s cluster for that matter) is that it doesn’t have any load-balancer implementation to handle LoadBalancer service types.
When you run Kubernetes on top of a cloud hosting platform like AWS or Azure, they are backed natively by load-balancer implementations that work seamlessly with those cloud platform’s load-balancer services. E.g. classic application or elastic load balancers with AWS.
However, with a Raspberry Pi cluster, you don’t have anything fancy like that to provide LoadBalancer services for your applications you run.
MetalLB provides a software based implementation that can work on a Pi cluster.
Install version 0.8.3 of MetalLB by applying the following manifest with kubectl:
kubectl apply -f https://gist.githubusercontent.com/Shogan/d418190a950a1d6788f9b168216f6fe1/raw/ca4418c7167a64c77511ba44b2c7736b56bdad48/metallb.yaml
Make sure the MetalLB pods are now up and running in the metallb-system namespace that was created.

Now you will create a ConfigMap that will contain the settings your MetalLB setup will use for the cluster load-balancer services.
Create a file called metallb-config.yaml with the following content:
apiVersion: v1
kind: ConfigMap
metadata:
  namespace: metallb-system
  name: config
data:
  config: |
    address-pools:
    - name: default
      protocol: layer2
      addresses:
      - 10.23.220.88-10.23.220.98
Update the addresses section to use whichever range of IP addresses you would like to assign for use with MetalLB. Note, I only used 10 addresses as below for mine.
Apply the configuration:
kubectl apply -f ./metallb-config.yaml
Setup Helm in the Pi Cluster
First of all you’ll need an ARM compatible version of Helm. Download it and move it to a directory that is in your system PATH. I’m using my Kubernetes master node as a convenient location to use kubectl and helm commands from, so I did this on my master node.
Install Helm Client
export HELM_VERSION=v2.9.1
wget https://kubernetes-helm.storage.googleapis.com/helm-$HELM_VERSION-linux-arm.tar.gz
tar xvzf helm-$HELM_VERSION-linux-arm.tar.gz
sudo mv linux-arm/helm /usr/bin/helm
Install Helm Tiller in the Cluster
Use the following command to initialise the tiller component in your Pi cluster.
helm init --tiller-image=jessestuart/tiller --service-account tiller --override spec.selector.matchLabels.'name'='tiller',spec.selector.matchLabels.'app'='helm' --output yaml | sed 's@apiVersion: extensions/v1beta1@apiVersion: apps/v1@' | kubectl apply -f -
Note: it uses a custom image from jessestuart/tiller (as this is ARM compatible). The command also replaces the older api spec for the deployment with the apps/v1 version, as the older beta one is no longer applicable with Kubernetes 1.16.
Deploy an Ingress Controller with Helm
Now that you have something to fulfill LoadBalancer service types (MetalLB), and you have Helm configured, you can deploy an NGINX Ingress Controller with a LoadBalancer service type for your Pi cluster.
helm install --name nginx-ingress stable/nginx-ingress --set rbac.create=true --set controller.service.type=LoadBalancer
If you list out your new ingress controller pods though you might find a problem with them running. They’ll likely be trying to use x86 architecture images instead of ARM. I manually patched my NGINX Ingress Controller deployment to point it at an ARM compatible docker image.
kubectl set image deployment/nginx-ingress-controller nginx-ingress-controller=quay.io/kubernetes-ingress-controller/nginx-ingress-controller-arm:0.26.1
After a few moments the new pods should now show as running:

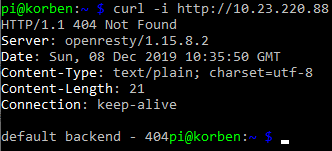
Now to test everything, you can grab the external IP that should have been assigned to your NGINX ingress controller LoadBalancer service and test the default NGINX backend HTTP endpoint that returns a simple 404 message.
List the service and get the EXTERNAL-IP (this should sit in the range you configured MetalLB with):
kubectl get service --selector=app=nginx-ingress

Curl the NGINX Ingress Controller LoadBalancer service endpoint with a simple GET request:
curl -i http://10.23.220.88
You’ll see the default 404 not found response which indicates that the controller did indeed receive your request from the LoadBalancer service and directed it appropriately down to the default backend pod.

Concluding
At this point you’ve configured:
- A Raspberry Pi Kubernetes network Router / DHCP / DNS server / jumpbox
- Kubernetes master node running the master components for the cluster
- Kubernetes worker nodes
- MetalLB load-balancer implementation for your cluster
- Helm client and Tiller agent for ARM in your cluster
- NGINX ingress controller
In part 1, recall you setup some iptables rules on the Router Pi as an optional step?
These PREROUTING AND POSTROUTING rules were to forward packets destined for the Router Pi’s external IP address to be forwarded to a specific IP address in the Kubernetes network. In actual fact, the example I provided was what I used to forward traffic from the Pi router all the way to my NGINX Ingress Controller load balancer service.
Revisit this section if you’d like to achieve something similar (access services inside your cluster from outside the network), and replace the 10.23.220.88 IP address in the example I provided with the IP address of your own ingress controller service backed by MetalLB in your cluster.
Also remember that at this point you can add as many worker nodes to the cluster as you like using the kubeadm join command used earlier.
