PowerCLI – script to deploy multiple random VMs

There are probably tons of scripts out there to deploy VMs in a vSphere environment, but I was in the mood for scripting this evening and decided to create my own PowerCLI script to automatically deploy multiple random VMs to my home lab. The point was to create random “content” for something exciting I have been working on 🙂


[download id=”19″]


$i = 1
[int]$NumberToDeploy = 10 # Number of VMs to deploy
[string]$NamingConvention = "homelab-VM-" # Prefix for VM names
[string]$folderLoc = "Discovered virtual machine" # Name of VM folder to deploy into

while ($i -le $NumberToDeploy) {
	$NumCPUs = (Get-Random -Minimum 1 -Maximum 3) #NUM CPU of either 1 or 2.
	$MemoryMB = ("16","32","64") | Get-Random # Get a random VM Memory size from this list (MB)
	$DiskSize = ("256","512","768" ) | Get-Random # Get a random disk size from this list (MB)
	$targetDatastore = Get-Datastore | Where {($_.ExtensionData.Summary.MultipleHostAccess -eq "True") -and ($_.FreeSpaceMB -gt "10240")} | Get-Random
	$targetVMhost = Get-VMHost | Where { $_.ConnectionState -eq "Connected" } | Get-Random # Selects a random host which is in "connected State"
	$targetNetwork = ("VM Network","VM Distributed Portgroup") | Get-Random
	$GuestType = (	"darwinGuest","dosGuest","freebsd64Guest","freebsdGuest","mandrake64Guest",
					"mandrakeGuest","other24xLinux64Guest","other24xLinuxGuest","other26xLinux64Guest",
					"other26xLinuxGuest","otherGuest","otherGuest64","otherLinux64Guest","otherLinuxGuest",
					"rhel5Guest","suse64Guest","suseGuest","ubuntu64Guest","ubuntuGuest",
					"win2000AdvServGuest","win2000ProGuest","win2000ServGuest","win31Guest","win95Guest",
					"win98Guest","winLonghorn64Guest","winLonghornGuest","winNetBusinessGuest",
					"winNetDatacenter64Guest","winNetDatacenterGuest","winNetEnterprise64Guest",
					"winNetEnterpriseGuest","winNetStandard64Guest","winNetStandardGuest","winNetWebGuest",
					"winNTGuest","winVista64Guest","winVistaGuest","winXPPro64Guest",
					"winXPProGuest") | Get-Random
	$VMName = $NamingConvention + $i

	if ((Get-VM $VMName -ErrorAction SilentlyContinue).Name -eq $VMName) {
		Write-Host "$VMName already exists, skipping creation of this VM!" -ForegroundColor Yellow
		}
	else {	
		Write-Host "Deploying $VMName to $folderLoc ..." -ForegroundColor Green
		#Create our VM
		New-VM -Name $VMName -ResourcePool $targetVMhost -Datastore $targetDatastore -NumCPU $NumCPUs -MemoryMB $MemoryMB -DiskMB $DiskSize `
		-NetworkName $targetNetwork -Floppy -CD -DiskStorageFormat Thin -GuestID $GuestType -Location $folderLoc | Out-Null
		}
	$i++
}


This script will automatically deploy a variable number of Virtual Machines, based on a certain naming convention you specify. It’ll also randomly choose VM settings. Here is what it does:


  • Deploy any number of VMs by changing the total number of VMs to deploy (specify in script as $NumberToDeploy)
  • Deploys each VM to a random ESXi host which is in a connected state
  • Deploys each VM to a random shared datastore (i.e. a datastore with multiple hosts connected)
  • Sets a random vCPU count to each VM (specify options in the script as $NumCPUs)
  • Sets a random Memory size for each VM (specify options in the script as $MemoryMB)
  • Create a virtual disk as thin provisioned on each VM with a random disk size (specify disk size options in the script as $DiskSize)
  • Adds each VM to a random VM network (specify VM network options in the script as $targetNetwork)
  • Specifies a random GuestOS type for each VM deployed
  • Creates each VM in a specified VM & Templates folder (specify in script as $folderLoc)


All options are already set to defaults in the script as is stands, but don’t forget to change important options unique to your environment like the $folderLoc (folder to deploy VMs into), and the list of VM networks ($targetNetwork). Other items are automatically determined (datastore and host to deploy to for example).

Also note that some of the built-in guestOS types might not be supported on some ESXi hosts. In these cases, the script just skips creating that VM and moves onto the next. You may see a red error message for the failed VM in these cases. For a full list of GuestID types, check out this page.

PowerCLI – creating port groups and specifications to modify port groups

I wanted to quickly create some standard VM port groups across a particular vSwitch for all hosts in my lab / testing environment at work. Since I was using Standard vSwitches and not a dvSwitch, I didn’t feel like using the GUI to create these on every individual ESXi host. In addition to creating the port group on each vSwitch, I also wanted to change the security policy on each for Promiscuous mode to “Accept”. The reason for this being that this port group is going to be used to run virtual nested ESXi hosts, and this is required to allow nested VMs to communicate on the network.


So the obvious solution here for me was to create a quick PowerCLI script to create these port groups on all hosts and set the security option for each too. Here is the script:


$vSwitch = "vSwitch0"
$portgrpname = "vInception Portgroup"
$AllConnectedHosts = Get-VMHost | Where {$_.ConnectionState -eq "Connected"}

foreach ($esxihost in $AllConnectedHosts) {
	$currentvSwitch = $esxihost | Get-VirtualSwitch | Where {$_.Name -eq $vSwitch}
	New-VirtualPortGroup -Name $portgrpname -VirtualSwitch $currentvSwitch -Confirm:$false
	$currentesxihost = Get-VMHost $esxihost | Get-View
	$netsys = Get-View $currentesxihost.configmanager.networksystem
	$portgroupspec = New-Object VMWare.Vim.HostPortGroupSpec
	$portgroupspec.vswitchname = $vSwitch
	$portgroupspec.Name = $portgrpname
	$portgroupspec.policy = New-object vmware.vim.HostNetworkPolicy
	$portgroupspec.policy.Security = New-object vmware.vim.HostNetworkSecurityPolicy
	$portgroupspec.policy.Security.AllowPromiscuous = $true
	$netsys.UpdatePortGroup($portgrpname,$PortGroupSpec)
	
}

 
Keep in mind that this script will create the port group on “vSwitch0” – change this if your vSwitch that is hosting this port group on each host is named differently. It will obviously rely on this vSwitch existing to work. You can also modify the $portgrpname to your own choice of course.

Lastly, you can easily modify this script to change other Security options for the new port group, as the port group specification has already been created in this script. Just use the $portgroupspec.policy.Security object to add other specifications.

Enjoy!
 

Generating Graphical Charts with VMware PowerCLI & PowerShell

Charts are awesome – they can help make sense of endless reams of text and data and they generally look pretty. So my question to myself was: “How do I get useful data I generate using PowerCLI into a nice, neat little chart?” I had a quick google and found a couple of different solutions. The one that stood out as being the easiest to start off with for me was to use the “Microsoft Chart Controls for Microsoft .NET Framework 3.5

I read a few blog posts around detailing how to create these custom .NET charts in PowerShell, but this tends to be quite a tedious process – akin to creating a Windows Forms GUI in PowerShell manually – basically a complete pain. The blog posts I read definitely helped me understand how to create charts and soon I was able to generate some pretty cool charts based off data from PowerCLI (or PowerShell) data. I wanted to ultimately automate the creation of Charts for my PowerCLI and PowerShell scripts, so I decided to create myself a Function that could be used anywhere to generate a Bar or Pie Chart on the fly.

httpv://youtube.com/watch?v=EvQ2znWr0lk

Enter Create-Chart. This is the Function I have made that accepts a bunch of Parameters to create a custom Chart and outputs this to a .PNG file. The data needs to be fed in to the function via a Hash Table (this could be changed) so I also created a “helper” Function called Create-HashTable which also does the work of generating a hash table for use with the Create-Chart Function. You could of course also just feed the Create-Chart function with a manually created HashTable too – this is useful to know because my Create-HashTable function is fairly basic and is not too flexible. Here are a couple of examples of Charts I created using these Functions:

Pie Chart of VMs and their configured Memory Resource settings
The same data but now in a Bar chart
Host Chart created with a manually created Hash Table (Name and MemoryUsageMB Properties)

Download the two functions below to give them a try! Please do suggest any improvements – my parameter handling on the Create-Chart script needs work – they are not specified as mandatory, although all parameters are mandatory – I couldn’t get the Function to work correctly when I did make them mandatory. The Create-HashTable function could also be improved in that at the moment you can only specify Cmdlets for the “Cmdlet” parameter that do not have any double quotation marks inside the cmdlet or any $_ variables. This is because of the way I am using the Invoke-Expression cmdlet inside the function. A simple cmdlet parameter such as “Get-VM | Select Name, MemoryMB” would work just fine for example. Remember that the Create-Chart function needs to be fed with a Hash Table. This could be generated yourself, or by using the Create-HashTable function below. Here are the downloads:

Don’t forget the Microsoft Chart Controls – a requirement to run these functions
Download the functions here:

https://www.shogan.co.uk/wp-content/uploads/Create-Chart.zip

https://www.shogan.co.uk/wp-content/uploads/Create-HashTable.zip

Once you have the Functions loaded, here are some examples to show you how to use them:

Pie Chart of VMs and their MemoryMB setting:

Create-Chart -ChartType Pie -ChartTitle "Sean's Awesome VM Chart" -FileName seanchart3 -XAxisName "VMs" -YAxisName "MemoryMB" -ChartWidth 750 -ChartHeight 650 -DataHashTable (Create-HashTable -Cmdlet "Get-VM" -NameProperty Name -ValueProperty MemoryMB)

Bar Chart of ESXi Hosts and their Memory Usage (MB) values:

Create-Chart -ChartType Bar -ChartTitle "Sean's Awesome Host Chart" -FileName seanchart4 -XAxisName "VM Hosts" -YAxisName "Memory Usage (MB)" -ChartWidth 750 -ChartHeight 650 -DataHashTable (Create-HashTable -Cmdlet "Get-VMHost" -NameProperty Name -ValueProperty MemoryUsageMB)

Use your own Hash Table to input the data:

Create-Chart -ChartType Bar -ChartTitle "Custom Chart" -FileName seanchart5 -XAxisName "My Objects" -YAxisName "My Object Values" -ChartWidth 750 -ChartHeight 650 -DataHashTable $HashTable

So there you have it – a fairly easy way to Chart the data you can get from your PowerCLI or PowerShell cmdlets! I wrote these Functions as part of a larger report that I am working on for another soon to come blog post! As I mentioned above, there is plenty of room for improvement – so if you do make any improvements or changes, please be sure to post them in the comments section.

Using dd to create and modify files (Windows or Linux)


How do you create files filled with random data to a certain size specification, and then overwrite a specified portion of this data? I’ll show you how to do this in Windows or Linux. dd is traditionally a Unix program, however there is a Windows port available. I have used this in my testing, but the command line usage is pretty much identical for Linux or Windows. Grab the Windows port over here (I used the beta 0.6 version).


My requirement was to be able to create a large file, say 10GB in size, and then replace bits of that file with random data (for example change the first 5GB of data in that file with random data).


An example use case would be to test how Rsync works with data that has changed slightly. Another use case may be to simply just create large files on a virtual disk attached to a VM (VMDK) and to see how a Backup Solution would handle change block tracking to intelligently backup only the blocks of a VM that have changed. With dd, you can specify how big you want a file to be created as, as well as whether or not that should contain random data, zero filled data, or content from another file amongst other things. Of course there are many other uses for dd, including copying or cloning files, partitions and other data types of data. Just be careful when using dd at a lower level, as it has the ability to destroy data too of course! (This is probably where it earned one of it’s nicknames “Data Destroyer”)


So to get started, simply put the dd.exe file in the location you want to work with, or set up an environment variable for it. To create a 10GB file with random data, you would use the following from your cmd prompt:


dd if=/dev/random of=testfile.txt bs=1k count=10485760


“if” refers to your input, “of” is your output, “bs” is your Byte Size and “count” is how many of these you want in your output.


Now, the cool part – using dd to overwrite a certain amount of your existing file:


dd if=/dev/random of=testfile.txt bs=1k count=1024 conv=notrunc


The above command would overwrite the beginning of the 10GB file with just 1MB (1024 count multiplied by 1KB) of random data. Notice the conv=notrunc bit – this means “do not truncate the output file”, or in other words if the output file already exists, it should only replace the specified bytes and leave the rest of the output file alone. It goes without saying that if you are overwriting data, you should specify the output as being an existing file.


If you would like to create a 1MB zero-filled file, simply use:


dd if=/dev/zero of=testfile.tst bs=1k count=1024


To create a file with content based on another file, you would use something like this:


dd if=samplefile.txt of=newfile.txt


Lastly, a useful parameter that I found is the –progress parameter. This is especially useful for large operations, giving you a visual size/percentage progress indicator on the current operation. Example:


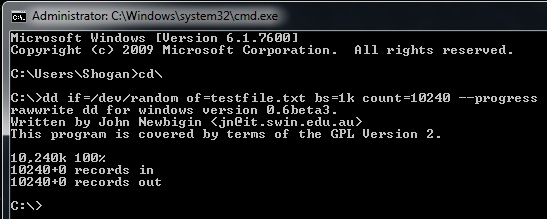
dd if=/dev/random of=testfile.tst bs=1k count=10485760 --progress


Here is the output after creating a random 10MB file with progress indicator in cmd prompt.