Cheap S3 Cloud Backup with BackBlaze B2

white and blue fiber optic cables in a FC storage switch

I’ve been constantly evolving my cloud backup strategies to find the ultimate cheap S3 cloud backup solution.

The reason for sticking to “S3” is because there are tons of cloud provided storage service implementations of the S3 API. Sticking to this means that one can generally use the same backup/restore scripts for just about any service.

The S3 client tooling available can of course be leveraged everywhere too (s3cmd, aws s3, etc…).

BackBlaze B2 gives you 10GB of storage free for a start. If you don’t have too much to backup you could get creative with lifecycle policies and stick within the 10GB free limit.
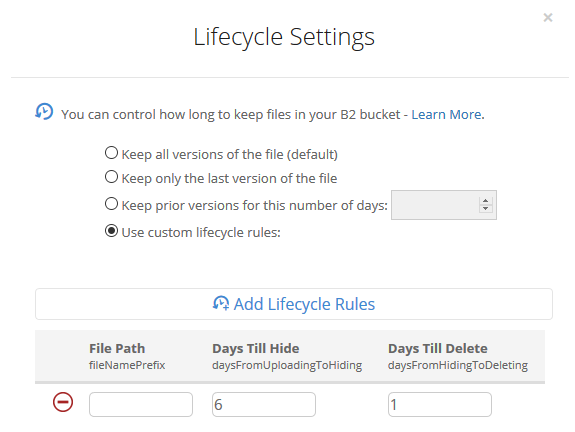
a lifecycle policy to delete objects older than 7 days.

Current Backup Solution

This is the current solution I’ve setup.

I have a bunch of files on a FreeNAS storage server that I need to backup daily and send to the cloud.

I’ve setup a private BackBlaze B2 bucket and applied a lifecycle policy that removes any files older than 7 days. (See example screenshot above).

I leveraged a FreeBSD jail to install my S3 client (s3cmd) tooling, and mount my storage to that jail. You can follow the steps below if you would like to setup something similar:

Step-by-step setup guide

Create a new jail.

Enable VNET, DHCP, and Auto-start. Mount the FreeNAS storage path you’re interested in backing up as read-only to the jail.

The first step in a clean/base jail is to get s3cmd compiled and installed, as well as gpg for encryption support. You can use portsnap to get everything downloaded and ready for compilation.

portsnap fetch
portsnap extract # skip this if you've already run extract before
portsnap update

cd /usr/ports/net/py-s3cmd/
make -DBATCH install clean
# Note -DBATCH will take all the defaults for the compile process and prevent tons of pop-up dialogs asking to choose. If you don't want defaults then leave this bit off.

# make install gpg for encryption support
cd /usr/ports/security/gnupg/ && make -DBATCH install clean

The compile and install process takes a number of minutes. Once complete, you should be able to run s3cmd –configure to set up your defaults.

For BackBlaze you’ll need to configure s3cmd to use a specific endpoint for your region. Here is a page that describes the settings you’ll need in addition to your access / secret key.

After gpg was compiled and installed you should find it under the path /usr/local/bin/gpg, so you can use this for your s3cmd configuration too.

Double check s3cmd and gpg are installed with simple version checks.

gpg --version
s3cmd --version
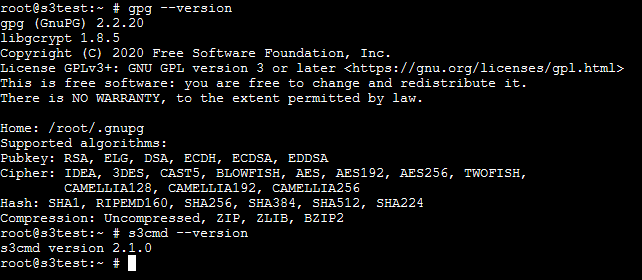
quick version checks of gpg and s3cmd

A simple backup shell script

Here is a quick and easy shell script to demonstrate compressing a directory path and all of it’s contents, then uploading it to a bucket with s3cmd.

DATESTAMP=$(date "+%Y-%m-%d")
TIMESTAMP=$(date "+%Y-%m-%d-%H-%M-%S")

tar --exclude='./some-optional-stuff-to-exclude' -zcvf "/root/$TIMESTAMP-backup.tgz" .
s3cmd put "$TIMESTAMP-backup.tgz" "s3://your-bucket-name-goes-here/$DATESTAMP/$TIMESTAMP-backup.tgz"

Scheduling the backup script is an easy task with crontab. Run crontab -e and then set up your desired schedule. For example, daily at 25 minutes past 1 in the morning:

25 1 * * * /root/backup-script.sh

My home S3 backup evolution

I’ve gone from using Amazon S3, to Digital Ocean Spaces, to where I am now with BackBlaze B2. BackBlaze is definitely the cheapest option I’ve found so far.

Amazon S3 is overkill for simple home cloud backup solutions (in my opinion). You can change to use infrequent access or even glacier tiered storage to get the pricing down, but you’re still not going to beat BackBlaze on pure storage pricing.

Digital Ocean Spaces was nice for a short while, but they have an annoying minimum charge of $5 per month just to use Spaces. This rules it out for me as I was hunting for the absolute cheapest option.

BackBlaze currently has very cheap storage costs for B2. Just $0.005 per GB and only $0.01 per GB of download (only really needed if you want to restore some backup files of course).

Concluding

You can of course get more technical and coerce a willing friend/family member to host a private S3 compatible storage service for you like Minio, but I doubt many would want to go to that level of effort.

So, if you’re looking for a cheap S3 cloud backup solution with minimal maintenance overhead, definitely consider the above.

This is post #4 in my effort towards 100DaysToOffload.

Running an S3 API compatible object storage server (Minio) on the Raspberry Pi

I’ve recently become interested in hosting my own local S3 API compatible object storage server at home.

So tonight I set about setting up Minio.

Image result for minio

Minio is an object storage server that is S3 API compatible. This means I’ll be able to use my working knowledge of the Amazon S3 API and tools, but to interact with my own, locally hosted storage service running on a Raspberry Pi.

I had heard about Zenko before (an S3 API compatible object storage server) but was searching around for something really lightweight that I could easily run on ARM architecture – i.e. my Raspberry Pi model 3 I have sitting on my desk right now. In doing so, Minio was the first that I found that could easily be compiled to run on the Raspberry Pi.

The goal right now is to have a local object storage service that is compatible with S3 APIs that I can use for home use. This has a bunch of cool use cases, and the ones I am specifically interested in right now are:

  • Being able to write scripts that interact with S3, but test them locally with Minio before even having to think about deploying them to the cloud. A local object storage API is going to be free and fast. Plus it’s great knowing that you’re fully in control of your own data.
  • Setting up a publically exposable object storage service that I can target with serverless functions that I plan to be running on demand in the cloud to do processing and then output artifacts to my home object storage service.

The second use case above is what I intend on doing to send ffmpeg processed video to. Basically I want to be able to process video from online services using something like AWS Lambda (probably using ffmpeg bundled in with the function) and output the resulting files to my home storage system.

The object storage service will receive these output files from Lambda and I’ll have a cronjob or rsync setup to then sync the objects placed into my storage bucket(s) to my home Plex media share.

This means I’ll be able to remotely queue up stuff to watch via a simple interface I’ll expose (or a message queue of some sort) to be processed by Lambda, and by the time I’m home everything will be ready to watch in Plex.

Normally I would be more interesting in running the Docker image for Minio, but at home I want something that is really cheap to run, and so compiling Minio for Raspberry Pi makes total sense to me here, as this device is super cheap to level powered on 24/7 as opposed to running something beefier that would instead run as a Docker host or lightweight Kubernetes home cluster.

Here’s the quick start up guide to get it running on Raspberry Pi

You’ll basically download Go, extract it, set it up on your path, then use it to compile Minio’s source code into an ARM compatible binary that you can run on your pi.

wget https://dl.google.com/go/go1.10.3.linux-armv6l.tar.gz
sudo tar -C /usr/local -xzf go1.10.3.linux-armv6l.tar.gz
export PATH=$PATH:/usr/local/go/bin # put into ~/.profile
source .profile
go get -u github.com/minio/minio
mkdir ~/minio-data
cd go/bin
./minio server ~/minio-data/

And you’re up and running! It’s that simple to get going quickly.

Running interactively you’ll get a default access and secret key in the terminal, so head on over to the Web UI / interface to check things out: http://your-raspberry-pi-ip-or-hostname:9000/minio/

Enter your credentials to login.

Of course at this stage you can also start using your S3 API compatible command line tools to start working with your new object storage server too.

Nice!

Corsair XMS3 RAM compatible with HP Microserver N40L

Just a quick post today on RAM compatibility with the good old trusty home lab server, the HP Proliant N40L Microserver. I am currently using Microservers for my home vSphere 5 lab, running ESXi 5.0 update 1.


I had 8GB of Corsair XMS3 PC3-12800 C9 (1600MHz) RAM lying around at home and wanted to put it back to good use. It does not have ECC, but I tried it out in my Microserver and it works! Despite being a higher voltage rated RAM kit (1.65v odd), it works with the Microserver’s 1.5 rated DIMM slots just fine. No need to buy an extra 8GB RAM kit with my second Microserver now.