Octopus Deploy Endpoint auto configuration on Azure VM deployment

I’ve been working on a very cool project that involves the use of Microsoft Azure, TeamCity and Octopus Deploy.

I have created an Azure PowerShell script that deploys VMs into an Azure Subscription (Web machines that run IIS) as a part of a single Azure Cloud Service with load balancing enabled. As such, the endpoint ports that I create for Octopus tentacle communication need to differ for each machine on the public interface.

I wanted to fully automate things from end-to-end, so I wrote a very small console application that uses the Octopus Client library NuGet package in order to be able to communicate with your Octopus Deploy server via the HTTP API.

Octopus Endpoint Configurator on GitHub

The OctopusConfigurator console application should be run in your Azure VM once it is deployed, with 4 x parameters to specify when run.

It will then establish communication with your Octopus Deploy server, and register a new Tentacle endpoint using the details you pass it. The standard port number that gets assigned (10933) will then be replaced if necessary with the correct endpoint port number for that particular VM instance in your cloud service. For example, I usually start the first VM in my cloud service off on 10933, then increment the port number by 1 for every extra VM in the cloud service. As the deployments happen, the console application registers each new machine’s tentacle using the incremented port number back with the Octopus master server.

Once the Azure VM deployment is complete, I tell the VMs in the cloud service to restart with a bit of Azure PowerShell and once this is done, your Octopus environment page should show all newly deployed tentacles as online for your environment. Here is an example of an Invoke-Command scriptblock that I execute remotely on my Azure VMs as soon as they have completed initial deployment. What I do is tell the VM deployment script to wait for Windows boot, so once ready, the WinRM details are fetched for the VM using the Get-AzureWinRMUri cmdlet for Azure, which allows me to use the Invoke-Command to run the below script inside the guest VM.


Invoke-Command -ConnectionUri $connectionString -Credential $creds -ArgumentList $vmname,$externalDNSName,$creds,$InstallTentacleFunction,$OctopusExternalPort,$OctopusEnvironmentName -ScriptBlock {
	
	$webServerName = $args[0]
    $DNSPassthrough = $args[1]
    $passedCredentials = $args[2]
    $scriptFunction = $args[3]
    $OctoPort = $args[4]
    $OctopusEnvironmentName = $args[5]
		
	function DownloadFileUrl($url, $destinationPath, $fileNameToSave)
	{
	    $fullPath = "$destinationPath\$fileNameToSave"

	    if (Test-Path -Path $destinationPath)
	    {
	        Invoke-WebRequest $url -OutFile $fullPath
	    }
	    else
	    {
	        mkdir $destinationPath
	        Invoke-WebRequest $url -OutFile $fullPath
	    }

	    Write-Host "Full path is: $fullPath"
	    return [string]$fullPath
	}
	
	# Download the Octopus Endpoint Configurator to C:\Temp
	[string]$ConfiguratorPath = DownloadFileUrl "https://dl.dropboxusercontent.com/u/xxxxxxx/Apps/OctopusConfigurator.zip" "C:\Temp" "OctopusConfigurator.zip"
	
	Write-Host "Unzipping OctopusConfigurator.zip" -ForegroundColor Green
    cd C:\Temp
    $shell_app=new-object -com shell.application
    $filename = "OctopusConfigurator.zip"
    $zip_file = $shell_app.namespace((Get-Location).Path + "\$filename")
    $destination = $shell_app.namespace((Get-Location).Path)
    $destination.Copyhere($zip_file.items())
	
    cd C:\Temp

    if (Test-Path -Path .\OctopusConfigurator.exe)
    {
        & .\OctopusConfigurator.exe http://theoctopusurl.domain API-XXXXXXXXXXXXXXXXXXXXXX $webServerName $OctoPort
        Write-Host "Reconfigured Octopus Machine URI to correct port number" -ForegroundColor Green
    }
    else
    {
        Write-Host "OctopusConfigurator not found!" -ForegroundColor Red
        Exit
    }
}
Changing Registry entries on multiple systems with PowerShell and Remoting


A few weeks ago, a colleague asked if I knew of a way to script the change or modification of the Registered Owner / Organization information on a Windows Server system (2003 or 2008). I knew that this could be achieved with PowerShell and had some initial ideas, so I spent a few minutes whipping up the script below.

For this to work, you should ideally have all systems on the same Windows Domain and have enabled PowerShell remoting on each system that needs to be changed. Of course you could also just run the script on a single workstation/server on its own without the need for PSRemoting.


# On all remote machines that need their info changed
Set-ExecutionPolicy RemoteSigned
Enable-PSRemoting # Say yes to all prompts
#region This part only needed if machines do not belong to the same domain...
# Note: This can be a security risk, only use if you are sure you want to allow any host as a trusted host. (e.g. fine for lab environments)
cd wsman::localhost\client
Set-Item .\TrustedHosts * # Say yes to all prompts
#endregion
# Run on your management machine/machine you are using to update all others...
$computers = @("SERVER1","SERVER2","SERVER3")

foreach ($computer in $computers) {
    Enter-PSSession $computer
    cd 'HKLM:\Software\Microsoft\Windows NT\CurrentVersion'
    Set-ItemProperty -Path . -Name "RegisteredOwner" -Value "Auth User"
    Set-ItemProperty -Path . -Name "RegisteredOrganization" -Value "Lab"
    Exit-PSSession
}


So the above should update your registered owner and organization details for each server listed in the $computers array. (Specify your own host names here). The above script should be easy enough to modify if you are looking to change other registry entries. Finally, don’t forget that you should always be careful when updating registry, especially via script – make sure you have backups!


Using dd to create and modify files (Windows or Linux)


How do you create files filled with random data to a certain size specification, and then overwrite a specified portion of this data? I’ll show you how to do this in Windows or Linux. dd is traditionally a Unix program, however there is a Windows port available. I have used this in my testing, but the command line usage is pretty much identical for Linux or Windows. Grab the Windows port over here (I used the beta 0.6 version).


My requirement was to be able to create a large file, say 10GB in size, and then replace bits of that file with random data (for example change the first 5GB of data in that file with random data).


An example use case would be to test how Rsync works with data that has changed slightly. Another use case may be to simply just create large files on a virtual disk attached to a VM (VMDK) and to see how a Backup Solution would handle change block tracking to intelligently backup only the blocks of a VM that have changed. With dd, you can specify how big you want a file to be created as, as well as whether or not that should contain random data, zero filled data, or content from another file amongst other things. Of course there are many other uses for dd, including copying or cloning files, partitions and other data types of data. Just be careful when using dd at a lower level, as it has the ability to destroy data too of course! (This is probably where it earned one of it’s nicknames “Data Destroyer”)


So to get started, simply put the dd.exe file in the location you want to work with, or set up an environment variable for it. To create a 10GB file with random data, you would use the following from your cmd prompt:


dd if=/dev/random of=testfile.txt bs=1k count=10485760


“if” refers to your input, “of” is your output, “bs” is your Byte Size and “count” is how many of these you want in your output.


Now, the cool part – using dd to overwrite a certain amount of your existing file:


dd if=/dev/random of=testfile.txt bs=1k count=1024 conv=notrunc


The above command would overwrite the beginning of the 10GB file with just 1MB (1024 count multiplied by 1KB) of random data. Notice the conv=notrunc bit – this means “do not truncate the output file”, or in other words if the output file already exists, it should only replace the specified bytes and leave the rest of the output file alone. It goes without saying that if you are overwriting data, you should specify the output as being an existing file.


If you would like to create a 1MB zero-filled file, simply use:


dd if=/dev/zero of=testfile.tst bs=1k count=1024


To create a file with content based on another file, you would use something like this:


dd if=samplefile.txt of=newfile.txt


Lastly, a useful parameter that I found is the –progress parameter. This is especially useful for large operations, giving you a visual size/percentage progress indicator on the current operation. Example:


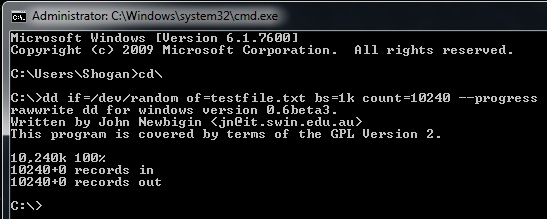
dd if=/dev/random of=testfile.tst bs=1k count=10485760 --progress


Here is the output after creating a random 10MB file with progress indicator in cmd prompt.


Modify your NIC MTU size setting in Windows Registry

A quick and easy blog post today on how to modify your NIC MTU (Maximum Transmission Unit) size setting in the Windows Registry.

By default your MTU won’t be defined in registry. Microsoft state that (Link):

The MTU is usually determined by negotiating with the lower-level driver. However, this value may be overridden.

To change your MTU setting in Windows Server 2003 or 2008 use the following steps:

  • Open regedit as an administrator account on the server in question.
  • Navigate to HKLM\System\CurrentControlSet\services\Tcpip\Parameters\Interfaces\[Choose the interface in question] (Do this by checking the correct IP address is in the settings under this key for the adapter you are configuring)
  • Once you are in the correct key for your interface, right-click and select new DWORD value (32 bit).
  • Call it MTU
  • Give this a decimal value equal to the setting you would like your MTU to be (measured in bytes).

For more information about Maximum Transmission Unit sizes, have a look at the official Wikipedia article.

Here is a screenshot of an MTU setting I made on this server using 1400 bytes as an example. This would obviously be tuned to whatever amount you are wanting to use for your NIC and specific application settings.

Change iPhone root SSH password

If you have jailbroken your iPhone and have SSH installed it is a very good idea to change your default root password. The default root password for the iPhone 3G is “alpine” many people know this and if you are not careful you could get someone gaining access to your phone over your service providers’ data network or over a local wifi connection.

iphone-ssh

Once SSH is installed and active login to your phone using PuTTY.  Download PuTTy here.

You will just need to specify your phone’s local wifi IP address and SSH as the connection method. When prompted, enter your username as : root and password as : alpine

Once you get a command line, type in the command “passwd” and press enter.

Enter your existing password of alpine, then specify your new root password. Be sure to keep this safe and secure! I found that after changing the root password on my phone I needed to restart it – close putty, then restart your iPhone.