AWS Control Tower Enrollment Gotchas

person looking down from on top of a control tower at an airport.

I have been working on moving a collection of about 20-30 AWS accounts from two different AWS Organizations into a new AWS Organization with Control Tower enabled. During the process I have run into a number of different blockers and issues which have not always had the most obvious solutions due to cryptic errors that the AWS Control Tower enrollment process shows.

This blog post lists out some of the issues I have run into during account migrations, and what the underlying reasons and resolutions ended up being.

You can’t use the AWS IAM Identity Center provided user or account root user when enrolling accounts

If you login to the management account and try to enroll member accounts into AWS Control Tower, you’ll get a cryptic error in the AWS Console like:

An unknown error occurred. Try again later, or contact AWS Support. No launch paths found for resource: prod-xxxxxxxxxxxx

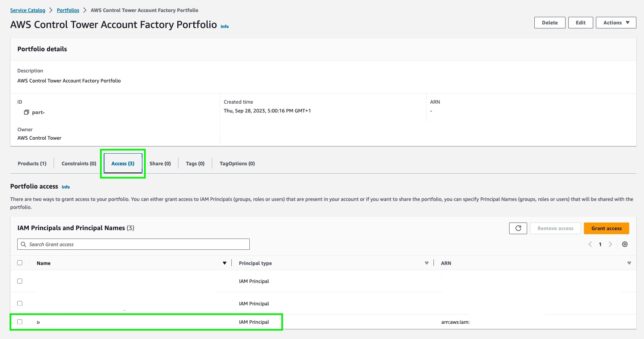
In my case, I was logged in initially with the AWS IAM Identity Center provisioned user account for the management account. This account is identified by the default Display Name of: AWS Control Tower Admin. The solution was to create a single IAM user with AdministratorAccess managed policy attached, then use the AWS Service Catalog console to add the user to the Portfolio Access on the AWS Control Tower Account Factory Portfolio item.

Once that was done, I could use the standard IAM user to login and successfully enroll member accounts into Control Tower.

In theory it should be possible to use the AWS IAM Identity Center provided user to enroll accounts into AWS Control Tower by ensuring it is added to the relevant Groups relating to provisioning and enrollment, but even after this I was unable to. Using a standard IAM user added to Portfolio access as above worked for me.

Forgetting to create the AWSControlTowerExecution IAM role in a member account before enrolling

Don’t forget to create the AWSControlTowerExecution IAM role with Principal ID access for the main Control Tower management account to assume during account enrollment.

This IAM role needs to be created before you can enroll accounts into AWS Control Tower. At a high level, it should be named AWSControlTowerExecution, it should have the AWS managed policy AdministratorAccess attached, and it should have a trust policy attached like the following:

{
   "Version":"2012-10-17",
   "Statement":[
      {
      "Effect":"Allow",
      "Principal":{
         "AWS": "arn:aws:iam::Management Account ID:root"
         },
         "Action": "sts:AssumeRole",
         "Condition": {} 
      }
   ]
  }

The process and role requirements are detailed in this AWS page.

AWS Config in existing accounts before enrolling them with AWS Control Tower

Here’s another issue that caught me out on one account. The account had it’s own AWS Config service Recorder and Delivery Channel setup (but it wasn’t actually being actively used).

When AWS Control Tower enrolls an account, it configures AWS Config with various best practices and configuration settings to record config changes. If there is existing AWS Config in the account, the enrollment process fails.

In my case I got the lovely error message:


I was scratching my head on this one until I decided to use the Update feature in the Control Tower console to try enrollment once more (where the account enrollment status showed Failed). The second time around, a clearer message was displayed:

AWS Control Tower could not enroll your account for the following reason: AWS Control Tower cannot create an AWS Config delivery channel because one already exists. To continue, delete the existing delivery channel and try again.

Trying to delete the AWS Config delivery channel was impossible though. AWS Control Tower applies guard rails via SCP, and because this account was partly enrolled, and now moved to an Organizational Unit (OU) that had SCPs attached to prevent AWS Config changes, it was impossible to remove the AWS Config settings that were blocking the enrollment process.

The fix was to ‘unmanage’ or un-enroll the AWS account (even though it wasn’t fully enrolled) using the AWS Control Tower console. Once that was done, and the account was moved back into the Organization root OU, I was able to use the AWS CLI to remove the offending AWS Config settings.

# find any delivery channels
aws configservice describe-delivery-channels

# describe delivery channel status
aws configservice describe-delivery-channel-status

# stop configuration recorder named 'default' (seen in describe above)
aws configservice stop-configuration-recorder --configuration-recorder-name default

# delete configuration recorder named 'default'
aws configservice delete-configuration-recorder --configuration-recorder-name default

With the AWS Config preferences removed, the AWS Config console should show the initial ‘Set up AWS Config’ option – i.e. nothing is configured. At this stage it’s possible to enroll the account into Control Tower successfully.

Feature Photo by id23: https://www.pexels.com/photo/person-on-air-traffic-control-tower-10893728/

DTrace/dtruss – an alternative to strace on macOS

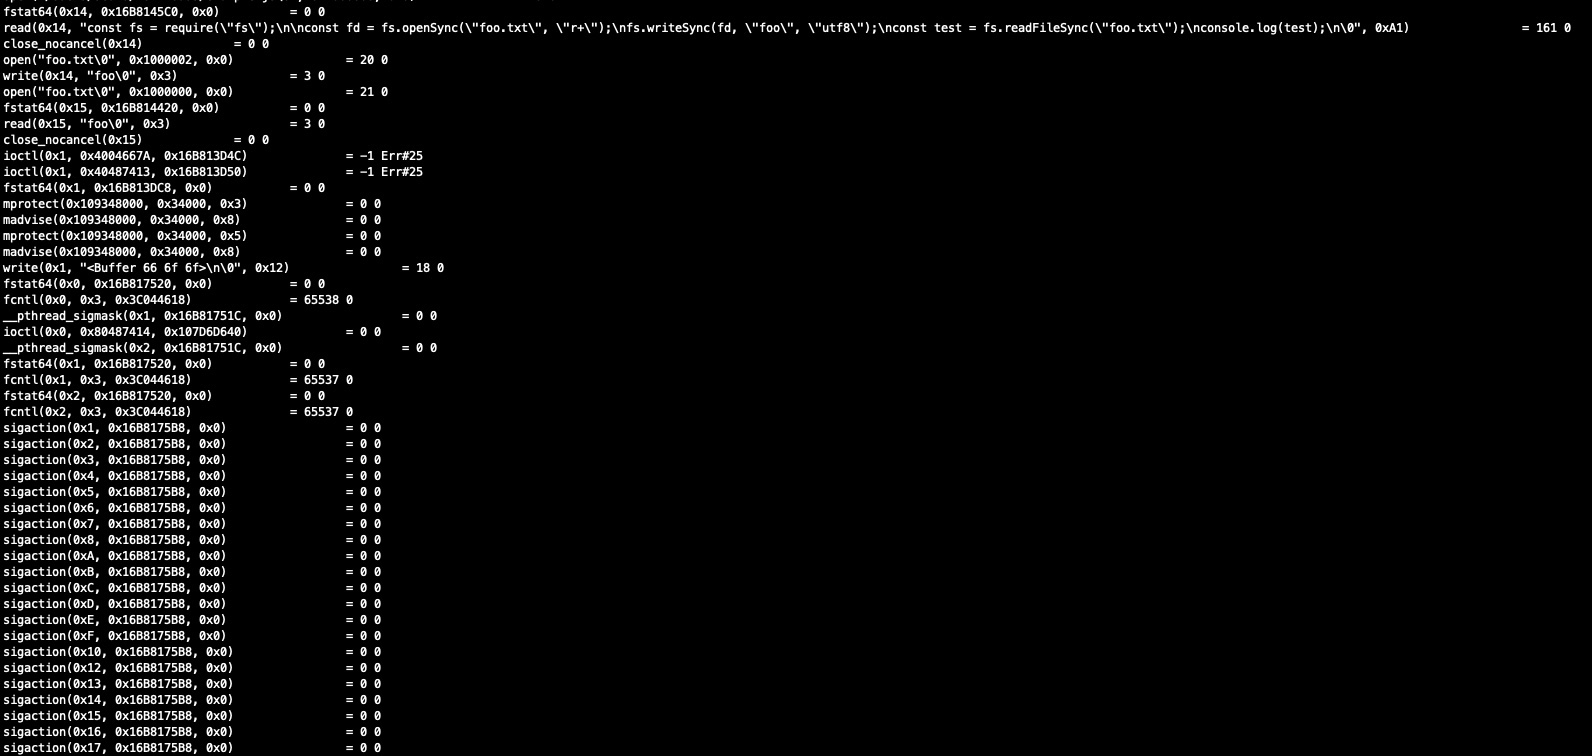
dtruss/DTrace output

If you’re on macOS and wanting to find out what system calls (syscalls) are being made by a process or application, you may have found that strace is not an option.

This is a quick post to demonstrate how to use DTrace to monitor system calls made by a process on macOS.

System Integrity Protection

First things first, you may find that newer mac systems have SIP (System Integrity Protection) enabled and that running dtruss will give you a warning about this. You’ll also likely not see much output at all.

It’s possible to disable this, but first be mindful of the security implications of disabling SIP, and second, be sure to set things back again once you’re done.

To disable SIP for DTrace, reboot your system into recovery mode (on my Apple M2 system I needed to shutdown completely, then power on, holding the button in until the recovery and startup options appeared).

Then I booted into the recovery tools, entered my usual user login, and used the menu bar at the top of the screen to open Utilities -> Terminal

Then ran:

csrutil enable --without dtrace

Tracing with DTrace/dtruss

dtruss is a DTrace version of truss, which is a Unix-specific command that prints out system calls made by a program.

We’ll use dtruss to see the syscalls made by a simple node application.

After this, a reboot back into the normal OS had me back at the terminal and ready to run dtruss.

Here’s a simple nodeJS program that we’ll trace.

const fs = require("fs");

const fd = fs.openSync("foo.txt", "r+");
fs.writeSync(fd, "foo", "utf8");
const test = fs.readFileSync("foo.txt");
console.log(test);

We load the fs module (used to make file operations), create a file descriptor pointing to existing file foo.txt in write mode, write the text “foo” to it, read it back by opening the file, and then write the result to stdout.

Let’s trace this program now.

sudo dtruss node example.js &> dtruss.log

Once that completes, you’ll see a lot of output detailing various system calls in the dtruss.log file. Much of this is made by the node environment itself, and a small part will be the actual example.js program. Scroll through until you find the part where the example.js script is loaded. It should start with

read(0x14, "const fs = require

Shortly after that you’ll see the syscalls made by the node program.

  • open (to open foo.txt)
  • write (to write the string ‘foo’ into the foo.txt file)
  • open (to again open foo.txt and read the content)
  • fstat64 which gets file status
  • write (with Buffer containing hexadecimal value for foo 66 6f 6f) to write the value to stdout.
read(0x14, "const fs = require(\"fs\");\n\nconst fd = fs.openSync(\"foo.txt\", \"r+\");\nfs.writeSync(fd, \"foo\", \"utf8\");\nconst test = fs.readFileSync(\"foo.txt\");\nconsole.log(test);\n\0", 0xA1)                = 161 0
close_nocancel(0x14)             = 0 0
open("foo.txt\0", 0x1000002, 0x0)                = 20 0
write(0x14, "foo\0", 0x3)                = 3 0
open("foo.txt\0", 0x1000000, 0x0)                = 21 0
fstat64(0x15, 0x16B814420, 0x0)          = 0 0
read(0x15, "foo\0", 0x3)                 = 3 0
close_nocancel(0x15)             = 0 0
ioctl(0x1, 0x4004667A, 0x16B813D4C)              = -1 Err#25
ioctl(0x1, 0x40487413, 0x16B813D50)              = -1 Err#25
fstat64(0x1, 0x16B813DC8, 0x0)           = 0 0
mprotect(0x109348000, 0x34000, 0x3)              = 0 0
madvise(0x109348000, 0x34000, 0x8)               = 0 0
mprotect(0x109348000, 0x34000, 0x5)              = 0 0
madvise(0x109348000, 0x34000, 0x8)               = 0 0
write(0x1, "<Buffer 66 6f 6f>\n\0", 0x12)                = 18 0
fstat64(0x0, 0x16B817520, 0x0)           = 0 0
fcntl(0x0, 0x3, 0x3C044618)              = 65538 0
__pthread_sigmask(0x1, 0x16B81751C, 0x0)                 = 0 0
ioctl(0x0, 0x80487414, 0x107D6D640)              = 0 0
__pthread_sigmask(0x2, 0x16B81751C, 0x0)                 = 0 0
fstat64(0x1, 0x16B817520, 0x0)           = 0 0
fcntl(0x1, 0x3, 0x3C044618)              = 65537 0
fstat64(0x2, 0x16B817520, 0x0)           = 0 0
fcntl(0x2, 0x3, 0x3C044618)              = 65537 0

Finally, don’t forget to reboot into recovery mode and set SIP back to the default.

Stand Reminder App – Remember to Stand

standing desk

I wanted a really simple stand reminder app in my system tray to remind me to stand up once in a while while working at my standing desk. (I started getting lazy and sitting most of the day instead of standing!) After trying a couple of apps on macOS, I didn’t have much success. One didn’t even pop up notifications or the selected sound effect, and the other one was paid only.

I thought I would just make a quick (and dirty) solution that worked for me using Rust.

Get the source and build your own copy here

Remember to Stand is a simple app run from the command line to remind you to stand up every now and then while working.

I’m no Rust expert but have been intrigued with the language, and hence decided to write a simple utility to remind myself to stand up every now and then at my desk.

If you don’t have a standing desk, you might want to use this to remind you to stand and take a walk around every now and then to stretch your legs.

The stand reminder app has a customisable time delay between the two different notification modes. It will pop up ‘toast’ notifications with a sound effect on each notification between standing and sitting mode.

When run, it will add a small icon in the system tray area (tested on macOS and uBuntu Linux 22.04).

Build

To build you’ll need to have the Rust tool chain with cargo installed. Compile into a single executable file with:

./make.sh build

Run

Once built, you can run the executable directly – e.g. `./target/debug/remember-to-stand`, or run directly from source with:

cargo run

Install

To install, build the app in release mode with:

./make.sh build --release

Then you can place the release executable in a convenient location. (For now you’ll need to copy the system tray icon and sound file to the same location too – copy from the ./resources or the target build directory to the same path that you place the executable in)

Configure

The app will automatically create a default configuration file in your user home path: ~/.remembertostand. You can edit this file to change the notification title text messages and customise the time delays between sitting and standing modes.

For example:

{
    "config": {
        "customstandmsg": "Stand up",
        "standtimesecs": "3600",
        "sittimesecs": "3600",
        "customsitmsg": "Sit down"
    }
}

I have not tested the app much more than my own system running macOS 12.4 (Montery), but given that its written in Rust it should be fairly portable.

I have tested the toast notifications on a linux system with gnome desktop, so I know that at least that component should work on that environment.

Give it a quick try by building with Rust for own system if you need something simple like I did for stand up reminders.

S3 Object Querying with JMESPath

A quick post with some useful querying patterns when using JMESPath queries to find keys in a target S3 bucket.

Finding and filtering with JMESPath expressions

Find keys ending or starting with a certain value, and sort by Size

Here is a JMESPath query using s3api to find and sort keys based on the ending with a certain value, with the sort then being applied based on the resulting key sizes.

aws s3api list-objects-v2 --bucket example-bucket --query "Contents[?ends_with(Key, 'example')] | sort_by(@, &Size)"

To do the same as above, but for keys starting with a specific value, change the ends_with boolean expression to starts_with.

List all objects in the bucket, selecting only specific target keys, you can use a command like:

aws s3api list-objects-v2 --bucket example-bucket --query "Contents[*].[Key,Size]"

To refine that down to the first 3 x items only, add [-3:] to the end. For example:

aws s3api list-objects-v2 --bucket example-bucket --query "Contents[*].[Key,Size][-3:]"

Pipe operator

The pipe operator is used to stop projections in the query, or group expressions together.

Here is an example of filtering objects in a bucket down, followed by another expression to find only those with a key containing the value example_string:

aws s3api list-objects-v2 --bucket example-bucket --query "Contents[*] | [? contains(Key, 'example_string')]"

Another example, filtering down to include only objects on the STANDARD StorageClass, and then only those starting with a specific value:

aws s3api list-objects-v2 --bucket example-bucket --query "Contents[?StorageClass == 'STANDARD'] | [? starts_with(Key, 'ffc302a')]"

Transforming property names

Transforming keys / properties can be done using curly braces. For example, Key can be changed to become lowercase key:

aws s3api list-objects-v2 --bucket example-bucket --query "Contents[*].{key:Key}[-1:]"

This can be useful if you have a large, nested object structure and wish to create a short property in the pipeline for use in expressions further down the line. This wouldn’t be the case in the S3 object structure we’re primarily working with here, but a query example would be:

"InitialResults[*].{shortkey:Some.Nested.Object.Key} | [? starts_with(shortkey, 'example')]"

Vim Cheatsheet

vim cheatsheet feature

A quick vim cheatsheet for those of us who enjoy using vim, but don’t use it often enough to have the command sequences committed to memory.

Starting with the simplest operations, and then moving on to a few more complex and difficult to remember ones.

Remember that you always start in normal/visual mode. To enter insert mode to start entering text, you can use i or I.

  • Quit without saving: :q!
  • Quit and write changes: :wq
  • Enter insert mode at beginning or end of current line: I
  • Enter insert mode at the current position of the cursor: i
  • Escape current mode: Esc
  • Search forward for text pattern: /text
  • Search backward for text pattern: ?text
  • Go to bottom of page: G
  • Go to top of page: gg

Copy/paste style vim operations:

  • Copy and line (yank): yy
  • Paste a ‘yanked’ line: p (after) or P (before) cursor.
  • Delete character before cursor: X and after cursor: x
  • Delete current line: dd
  • Delete current line and start insert mode: cc

Deleting

  • Delete all lines in file: ddgD

Sorting

  • Sort all lines (no range): :sort
  • Sort all lines (no range, reversed): :sort!
  • Add options to the sort command:
    • i – ignore case
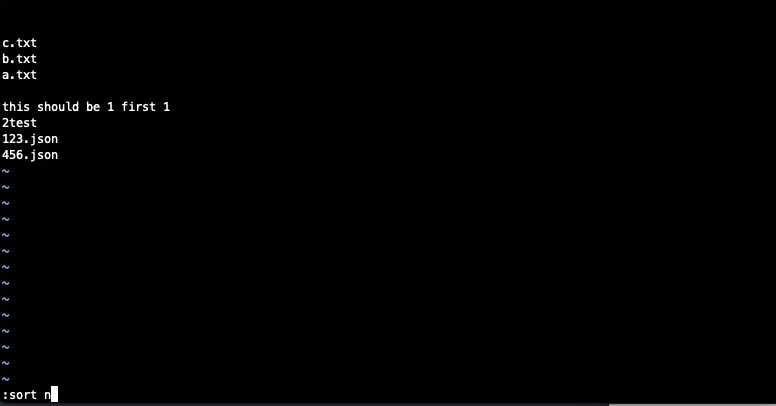
    • n – sort based on the first decimal on the line
    • f – sort based on the first float on the line

Some useful, yet more arcane vim operations:

  • Clear all lines in a file (1 is the first line, $ is the last line, and d is delete): :1,$d
  • Insert the result of Vimscript expressions into your file:
    • Enter Vim’s command line: Enter INSERT mode, and type CTRL + R =
    • Type a Vimscript expression, for example system("ls") and press ENTER
    • The output of the command ls will be inserted into the buffer.

Example of the above vimscript expression register result insert:

This of course only scratches the surface of the surface of what can be done. It’s just a quick little vim cheatsheet that I’ll refer back to when I get a little rusty.

The advanced or more arcane commands are the useful ones that I tend to forget when I’m not using them on a daily basis. I’ll certainly be recalling this post and updating those with new ones that I find useful in the future.